diy burlap center pieces for a party, wedding or home decor

Tuesday 28 August 2012


Burlap is a wonderful fabric that can be dressed up or dressed down ... just like your favourite pair of jeans. I see burlap being used everywhere from home decor to wedding and party decorations in magazines, stores and of course, on Pinterest boards.
This a little project that I came up with to decorate my new home. I simply added burlap to assorted sizes of clear vases to create beautiful centre pieces.
Here's my quick tips on how to do this yourself:
There are lots of different colours of burlap to use ... I like the look of the natural burlap for fall. I cut the burlap so that it will fit around the vase with a 1" overlap at the back. If the burlap is taller than the height of your vase you can easily cut the burlap to fit. If the burlap is not as wide as the height of a taller vase then position the burlap on the vase so that some of the glass vase is visible at the top or bottom (or both).
Use an elastic band to keep the burlap in place. Hint: place the elastic band in the area that you will want to add the ribbon accent!
Note: I use marbles inside my vases so that I can arrange my flowers. You can see the coloured marbles peeking through the burlap because I shoot this photo with the sunlight in the background.
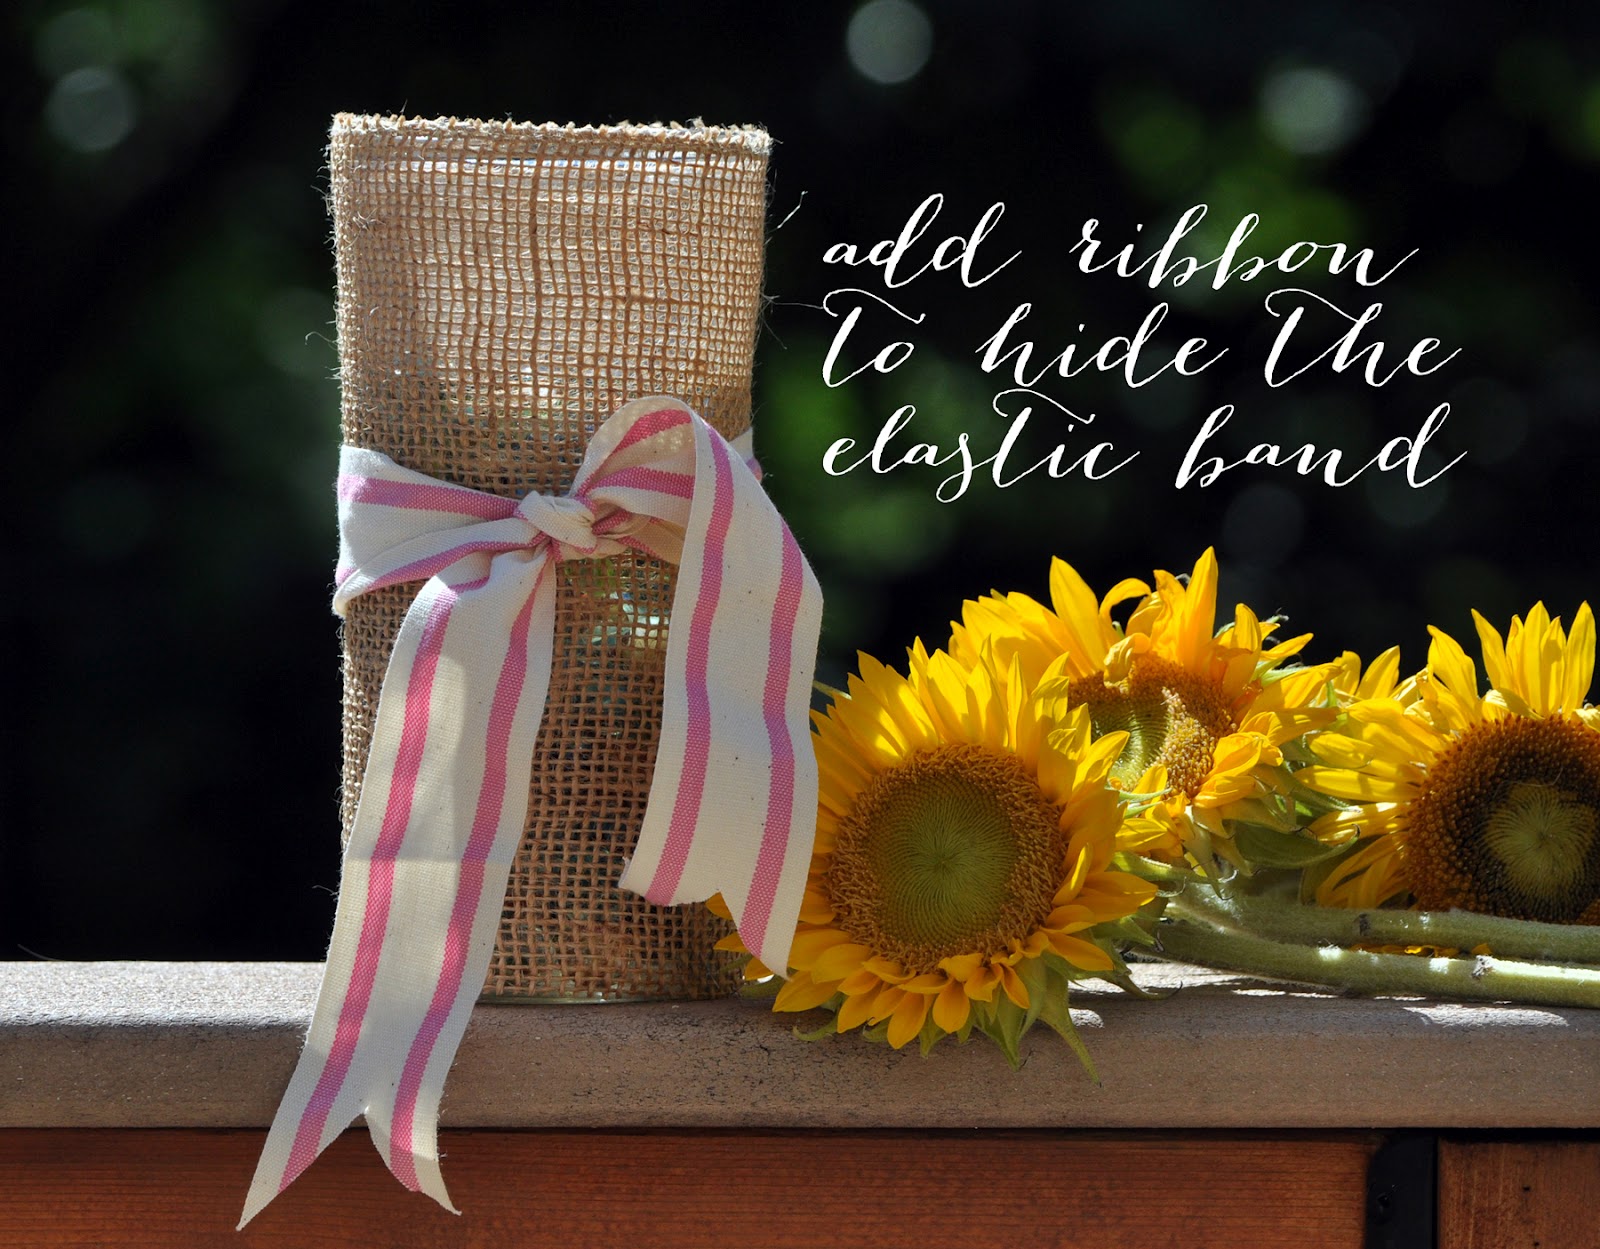
The last thing that I did was to add a simple ribbon detail. I love the eco organic cotton ribbons that we have available in the stores and online right now because they are so easy to work with. I used this pink double striped ribbon because it reminds me of vintage ticking fabric and it looks great with the burlap. A simple knot and a quick decorative edge to the ribbon and we are ready to add our flowers.
This is how I displayed one of my burlap vases. I wanted to create a centre piece to use on the kitchen counter. I added a stack of old books to a large metal serving tray. Then I placed the vase of flowers on top of the books and beside the vase I added an old weathered bird garden statue.
I think this arrangement would be lovely at a fall wedding or party. If you want to do a similar look to this centre piece for a wedding or large party with lots of tables, you can usually find lots of inexpensive old books at second hand stores and (library) book sales. Instead of trying to find lots of old serving trays you could use our disposable wood serving trays ... just add paint or stain to match your decor. Then add a table number sign beside the vase (where I have the bird) and you have a simple diy table centre piece that is both beautiful and practical. 

entertaining inspiration using wood serving boats

Tuesday 21 August 2012

I took home some of our popular wood serving boats and bamboo skewers last week to use for some weekend entertaining and here's some of the ways that I used them.

Friday night: Cookie cutter sandwiches and chips made a great late in the day snack while the we hung around the pool with friends after work.

Saturday: The kids had a mid morning snack with mini pancake muffins I purchased at the grocery store. I added some cream cheese and fresh fruit to make these as yummy to look at as they were to eat.

Saturday: Chicken sliders with pretzels for lunch. Gotta love mini sliders ... they are so easy to store in the freezer and when you present them in these wood serving boats they make last minute entertaining a breeze.

Sunday: Another mid day snack for the kids! Peanut butter cookie cutter sandwiches with banana slices and strawberries. Have a nut allergy? Use a spreadable cheese instead!

I loved how natural the serving boats look and although they are disposable, I was easily able to wipe them out and reuse them if they were originally used to contain food items like chips and candies that were not messy.

The wood serving boats looked fabulous with our mason jars (available in stores only), daisy mason jar lids and paper straws. Adults seem to like using the mini mason jar glasses just as much as the kids.

Just in case you are wondering how I made the cookie cutter sandwiches ... here's my tricks and tips ...

I used a star cookie cutter but you can use any shape you want. Just keep in mind the size of your serving tray. I usually prep all of my food first. Any veggies to be used as garnishes on the bamboo skewers are washed and set off to the side in small bowls. I usually cut all of the sandwich elements (bread, cheese, etc) separately so I don't waste any food. (Who am I kidding? The kids and I eat all of the food scraps while we are preparing these!!) Assemble each sandwich as you wish using the cut out shapes.

One tip that I do have is that many cold meats don't cut well unless the meat is thick ... so I will cut the cold meats in between two slices of bread as shown in photo "two" above. Keep in mind that you don't have to use the cookie cutter for every layer of your sandwich. Bacon and a little bit of lettuce would look great sticking out of a "turkey, cheese, bacon, tomato and lettuce sandwich" ... Yum!!

Another tip: If you are using spreadable foods such as peanut butter, jam, etc add them to the cookie cutter bread shapes instead of making the sandwich and trying to cut it out like I did with the cold meats. It will save you time cleaning the cookie cutters in between each cut.

To make the veggie garnishes on the bamboo skewers I try to arrange the veggies so that the veggies stay in place on the skewers. You can see that I "tied" a piece of carrot (I used a veggie peeler to create the long thin pieces of carrot) between the cucumber and grape tomato. The cucumber slice kept the carrot from falling down.

To make the bamboo skewers stand up straight on a cookie cutter sandwich, you need to make sure that the sandwich is thick or the stick will fall over from the weight of the veggies. I usually make my cookie cutter sandwiches triple deckers.


go natural with canvas and burlap bags plus a {free} iron on transfer download

Tuesday 14 August 2012

Our cotton canvas  and burlap  bags are a natural choice if you are looking for a cloth bag to package your products or use as a favor for your wedding or special event.

I love that you can embellish these bags so easily and in so many ways. Depending on the look you are after, it is possible to sew, paint or stamp on these bags. You can even add iron on transfers!

Keep in mind that iron on transfers or stamp designs with lots of detail will work best on the canvas bags. The burlap bags have a very open weave and work best with designs that are bold and solid and they will give you a worn or aged look similar to the type on the linen pillow in my first picture.
You can use stamps on the canvas bags and our canvas ribbons (as seen above) using permanent inks and clear stamps. I prefer the clear stamps so that you can see where you are stamping the image. There is an assortment of clear stamps, acrylic blocks for clear stamps and permanent inks in the Creative Studio at the Toronto store.
Fabric flowers are a great way to decorate both the burlap bags and the cotton bags.

If you are looking for more burlap ideas for your wedding or special event, check out my "burlap love" Pinterest board for inspiration.

I created the "bee happy" iron on design for one of my workshops. If you would like to use my design in one of your personal projects I have added it as a download.
Note: This art is for personal use only. No commercial use please!


You can download the art here. Please remember that you will have to reverse the art before you print it on the iron on transfer sheet.

Bee Happy!


White summer dinner party {part two}

Saturday 11 August 2012

In my last post I talked about a friend's white summer dinner party that I was helping with.  My friends took part in Niagara-on-the-Lake's Diner en Blanc.

Never heard of "Diner en Blanc" before ... don't worry, neither did I until I started working on the project. Diner en Blanc started in Paris France over 20 years ago and you can learn more about the event here.  Basically, it is a flash mob "dinner" and everyone is dressed in white and the tables are decorated in white.

We have so many different whites and I decided to combine them all from pure white to antique white. My secret for mixing different whites is to add lots of different textures when selecting materials. I used a vintage Paris theme featuring vintage textbook papers and bird motifs.

one. Here's the wine charms that I showed you in my last post. Wine is a very important part of Diner en Blanc!

two. We used our white trees as centrepieces and decorated them with birdcage favors (spray painted antique white with tea lights inside), book paper flowers and birds and menus printed on old book pages.

three. Napkins are an important part of the Diner en Blanc tradition and we added an iron on transfer to ours (featuring the text from a vintage postcard from Paris) before we folded them and wrapped them up with handmade paper and ribbon napkin rings. These will be placed on each plate with the silverware as shown.

four. We used white burlap, ribbons and canvas banners create simple chair covers. I designed and added the art for the canvas banners using my home computer/printer and our iron on transfer sheets.

five. A nine foot table runner was easy to make using white burlap and assorted ribbons. I machine stitched all of the ribbons to the burlap including the diamond wrap. We weaved a couple of strands of lights through the burlap so that the table runner will light up during the evening.

There are a few other projects that we created as well and I look forward to sharing pictures of the final set up when I receive them!  
Here is a video I thought that you might like to see of Diner en Blanc 2011 from Paris ... they were just outside Notre-Dame! Enjoy!!


white summer dinner party {part one} wine charms

Tuesday 7 August 2012

I helped a couple of friends to plan a summer dinner party that has a "white" theme and this is one of the projects that I came up using our resin flowers ... wine charms! Because I had to use the white resin flowers on all of the charms I added the guest's first initial on the other side of the bottle caps using our Sticker You custom labels.

These were a very simple project and took us no time to put together. I punched a hole in each bottle cap* so that I could add a jump ring for the ribbon. I tied the ribbon to the jump ring with a knot and made sure that there was enough ribbon to tie onto the wine glass stem. Then we glued the small resin flowers to the back of the bottle caps using E-6000 glue*.
Once the resin flowers were dry we turned the bottle caps over and added the initial stickers that I created using our Sticker You sticker sheets. I printed the initials on the blank custom sticker sheets on a laser printer and cut them out using a 1" circle paper punch*. The next step was to peel the back off the stickers and press them into place on the inside of the bottle cap. We then added a thin coat of Inkssentials Diamond Glaze* to give the shiny resin like finish. It took about 6 hours for the diamond glaze to dry.

Tip 1: If you are going to use the diamond glaze on the sticker it is important to print the sticker on a laser printer. If you use an inkjet printer the ink on the sticker will run when you add the diamond glaze. If you do not have access to a laser printer, then omit the diamond glaze step.
Tip 2: You do not want to fill the bottle cap with too much diamond glaze because it will take all day to dry and you may find that the diamond glaze will leak where you punched the hole for the jump ring.

I designed and helped to create a number of other projects for this white themed dinner party and I will tell you more about them in my next post.
*Note: The bottle caps, E-6000 glue, Inkssentials diamond glaze and 1" circle paper punch are only available in limited quantities at the Toronto store.


everything tastes better on a {lollipop} stick

Friday 3 August 2012

My daughters have always told me that "everything tastes better on a stick". When I saw a picture featuring Oreo cookie pops on Pinterest a while ago, I knew that I would have to try to make them with the girls.
We made our Oreo cookie pops as a treat to take to a friend's cottage the other weekend so I also had to come up with a way to display them. I started with an acrylic glass and filled it with styrofoam to hold the lollipop sticks straight. Then I added some paper sizzle to hide the styrofoam. I also tied a ribbon to one of the lollipop sticks to add a pop of colour. I can easily see these displayed at a food bar or at a birthday party.
Here's how I made the Oreo cookie pops:
I used the Double Stuf Oreo Cookies, our lollipop sticks, chocolate candy wafers and sprinkles.
1. Carefully insert the lollipop sticks into the white centre of the Oreo cookies and set aside.
2. Melt the chocolate candy wafers as per the product instructions and dip the top half of the cookie into the melted chocolate to coat.
3. Add coloured sprinkles before the chocolate hardens.
4. Set aside to dry.
Note: I only dipped the chocolate to cover about 1/2 of the cookie so that we could see the Oreo cookie logo. I also thought that it would be easier to set the cookies down to dry if they were not completely covered in chocolate (see photo below). You could cover the whole cookie if you want or use a different colour of candy wafer to tie into your party colour theme.

Hopefully, you will agree with me that "Oreo cookies taste better on a stick"!